Monday, July 25, 2022

A bunch of little (and not so little) things

 It's been a couple of weeks since I did a 'real' update.  It's not that I haven't been working on the trailer, but rather because most of it hasn't been blog/photo worthy.  Except that I forget that some of the things are big milestone items.  Over the past 3 weeks, I've been struggling with 'the hatch'.  It has been bit my own nightmare in the making, so when I realized that the hatch I built just was not going to work, I have consigned it to fuel for the Solo stove and started over.  The new design is much more along the lines of the 'standard' with heavier multi-component side rails and lateral stringers.  I should have a post on it next week.  I'm also making headway on getting the battery pack assembled and wired, and on getting the shore power/transfer switch installed and wired.  

So to keep things moving and allow me time to think about hatch mechanics, I have now:

  • Installed the doors
    There are _tons_ of good videos on door installation.  I've gone thru a couple of rolls of butyl tape getting them in place.  Sticky stuff!  For reference, I went with the Challenger doors.  Less expensive, and OK for quality, but I don't have a good frame of comparison.  They were being purchased by Lippert at the time I ordered the doors, and delivery was 10 weeks.


  • Installed the MaxxFan
    I made a (correctable) mistake doing the final cut on the roof. Fortunately, it was cosmetic only and never to be seen by anyone.  For guidance, when cutting the top, it's adviseable to drill all 4 corners, and then draw lines between the holes - and maybe even paint tape to protect the paint from the saw.  It's easy to get an aluminm chip between the skin and the base of the saw.  Once you get the rough cut with a jigsaw, it's easy to make one final pass with the trim router and a flush cut bit to trim the hole back to the 14" frame dimensions.  Butyl tape to seal the fan into place and carefully tighten down the screws.

  • Installed the Propex heater (well physically anyway)
    This is an(other) install that has morphed a bit as physical reality met initial visualization!  I cannot overstate the complexity added by air ducts...  They do not simply mold into space- you have to account for bends, interference and inflexibility.  As you can see from the picture, I have an interference between the corner of the inverter and the hot air duct. That would last perhaps one trip before it rubs thru.  I'll print a cradle  for the duct that should protect it from abrasion.  I also raised, and offset the heater by an inch or two from the original mounting to give a little better bend radius for the ducts.  This isn't a big deal, and where the lines pass thru the floor will get centered/sealed as well.  
  • Designed/printed registers for the AC ducts
    This was a relatively simple task.  Visualizing designs in CAD has become a lot simpler for me, and it's cut trial and error down to a couple of iterations.  In this case, I initially tried to make the blades too fancy, which resulted in a less than stellar print.  Second  try I also angled the blades to give a little direction to the airflow.  It's a little time consuming, but with a decent printer, not too challenging.


  • Tossed out the plan to use a big ugly black metal box for the tongue box and gone with a svelte hand designed and cut one, mostly using scraps.  And it's looking good (so far)
    The profile of the box parallels the front of the trailer, and mimics the curve.  I'd convinced myself it would be too much work, but in hindsight - I'm an idiot:)  
    The hatches came in last night, and I'll cut the end caps to mount the hatches.  
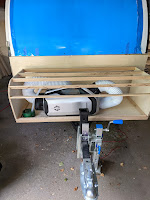


  • One [more] thing I didn't account for very well - the ductwork takes up a *lot* of space!  It'll all work, but I think the kibble bag may wind up staying in the car!  The box is big enough to add a few tools, but the ductwork does limit some utility.  It looks a lot sharper than the big metal box!  

Thursday, July 21, 2022

Printed material

One of the most frustrating parts of a build are the little odds and ends that are required - adapters, plugs, grommets, vents, and other weird little widgets made of plastic and filling those 'specific purpose' needs.  The pursui t of which involves finding that none of the local suppliers have anything close, searching the net, finding something sort-of close, ordering it, waiting days for it to arrive, during which time your project is on hold, and then finally getting it and learning it... doesn't fit.  

I'm fortunate to have both the 3D printers, and some reasonable beginner CAD design skills to be able to visualize many of these, design a prototype, and then print it.  Sometimes it works, sometimes it takes a couple of attempts to get it right.  But with an hour of my time, and a couple of hours to print it, and I can quickly validate my assumptions, the part fit, tweak it a bit if needed, and it's ready to use.  


One example of this is the new ZeroBreeze Mk II air conditioner.  The Zero Breeze box contains the necessary ducts and fittings for the AC end, but nothing for the end of the duct.  Since my AC will be mounted in the tongue box, and piped back into the trailer body, I really didn't want the outlet to be a 4'' diameter piece of white plastic tube poking into the trailer!  It took me about 30 minutes to draw out in FreeCAD, 8 hours to print the prototype, 10 minutes to make changes to the louvers and outer chamfer, tweak the thickness, and then a second iteration to print (5 hours) a production quality version.  One feature of this version is that the louvers are angled 10 degrees to aim the air away from our heads while sleeping. 


There are a bunch of items that I've done the same for - from a pad for the bottle jack to fit over the 2¨frame tubes, to end caps for the rails, to collars for cable routing, and wire-way covers for burying wire in the walls.  I've included most of them in 3D prints for Teardrop build.  Feel free to copy, or if you see something you need, I will be happy to sell them as well.  I'm also available for design/prototype and custom print work.


I need to print two more - one for the return air, and a hot exhaust for the bottom of the box.  The one going out the bottom will have a little longer snout, and will have a 'lid' to clamp in a piece of screen to keep critters and insects out.


Thursday, June 23, 2022

Slow week

 At certain points in a build, progress comes down to courage as much as it does knowledge or determination.  Knowing what needs to be done, and generally how to do it still requires the courage to make i,rreversible cuts, decisions about placement, drilling holes in walls, etc, etc.  

I've let several of those things slide until now - I have multiple tasks, each of which require the courage to make happen.  

First, up front.  I was probably overly ambitious with the headboard design.  It came out just fine, but in the process, I buried several things in the background - all of which now need attention before I can seal it up.  I finally got the hinges for the headboard doors, and installed them.  Check.

I cut (and re-cut) and varnished the dividers that sit between the storage and utility bays in the headboard, cut and varnished the back wall of the bays, and sort of figured out what goes where in terms of power, ducts and connections in general.  Pics on the front end next week.  So it's now ready to seal up which should happen this weekend.

The other end of this project is the hatch.  I've left it for last just because it's, well, the hatch.  Several design elements were left to figure out as I went along, and now things like gasketing, final end caps and so on are coming back to haunt me.  

The good news is that the skeleton is screwed and glued, and it's reasonably square.  Outer skin will go on tomorrow (glue and staples, and then I will work on end caps and attaching the hurricane hinge.  

Other tasks for the weekend:  

  • Sand and varnish the cabin sole (floor)
  • Mount the heater and route ductwork to vents
  • Cut roof skin, seal and install MaxxFan
  • Continue work on corner trim
More pictures next week - promise.

Thursday, June 9, 2022

Agile Development

Especially for those in the IT world, the term ¨Agile¨ is usually met with both joy and trepidation.  Done well, it's one of the best things that has every happened to project management, software development, and well, almost anything.  However, it's rarely done 'well', and we'll leave it at that since this is a family show.

This project is possibly the most agile project I've ever done.  Everything about it has been an iterative design.  Almost nothing is exactly as I originally sketched it out, and design goals have shifted as I learned new things.  There are also things like the A/C system I mentioned in an earlier post that drove a major change in the front end, and the ripple from *that* change has kept on giving all the way to the back of the trailer.  In some ways I wish I'd waited to order the inverter - I originally bought with the expectation that I could run the house AC unit on battery for a couple of hours a night and recharge either via solar or plug-in.  Since the new AC runs on 24vdc, I now have a 2500 watt inverter to run the Instant Pot, and to charge laptops.  Just a little overkill, I think.  But it's bought, paid for and too long out of the box to return, so I'll bolt it in anyway.

The board above will get screwed in to the back of the bay.  The batteries will mount on the floor, taking most of the clear space at the bottom.  What's not shown here (future post) is circuit protection, AC switching, the master switch, etc.  That's all going up above the counter where they can be accessed without performing contortionist routines.  And I still have to balance and assemble the battery pack and BMS - not hard, but somewhat tedious and it does require a certain amount of care to avoid arc welding with your fingers.  At the end of the day, I'll have 100aH 24volts of LiFePo4 battery stuffed behind the wall to power all the creature comforts.


Monday, June 6, 2022

It's really blue right now...


I feel like I need a little Christmas tree to put on top!

Tonight was a big step - the last major bit of aluminum (but not the last major bit of work) is on the trailer.  

I called it a wrap tonight with the panel on and secured with screws and clamps. Tomorrow I'll start over at the back, unclamp it, contact cement a section, get it glued down, and then do the other half/thirds.

The top panel is 5x10x.100, which is a bit heavier, but means there are no seams on the top from the hurricane hinge forward to the 'tongue box' - or what I'd planned to be the tongue box.  

To say there have been a few design changes along the way is being kind.  As mentioned in the last post, I had initially planned for a window air unit in the tongue/utility box.  Moving to a commercial box means I have a lot less complexity up front, but does mean I have a front panel to close up. 

Once the side panels were glued down, I used a jigsaw to get close - typ 1/4¨ and a trim router with a cheap import carbide bit to bring the panels down to the correct line.  One tip on the jigsaw - make sure you get the right blade - the very thin metal blade clogged up so quickly that it was unusable after only a foot of .040.  The 'thin' blade worked fine.  Vacuuming up all the bits of aluminum was a major effort!  And even though you see all the junk piled inside, I did protect the inside to keep the chips out when cutting the sides.

Next up - the front panel and the hatch.  Any bets which one is going to be more work??

Thursday, June 2, 2022

Diamonds


Today was the start of one of the last major steps in the build - skinning the outside!

I chose to add diamond plate to the lower sides, and to the nose, wrapping back about 9 inches around the front.  I actually did this for a couple of reasons.  First, the diamond plate provides an exta layer of protection for the parts most likely to get rock chipped or dinged from things I can't control.  Second (and probably more important) I could not get a 5x12 sheet of .040 aluminum at anywhere close to a reasonable price or distance.  Since the trailer is about 123 inches long and 56 inches high, this allowed me to skin the trailer without any awkward seams.
If the weather cooperates, the outside could be all skinned up by Tuesday!


On other subjects, I've finally made a number of decsions about things like AC, heater position, and tongue box.  For anyone in IT or project management - this is hands down the most Agile project I've ever done.  The entire design process has been very iterative, making significant changes based on the learnings from the previous sprint.  It's almost literally run on two week sprints, I've had to assign 'story points' to tasks, the definition of 'done' keeps shifting based on progress from each sprint, and so on.  

One of the areas where this has been most apparent is air conditioning.  i thought I had this wired. I had been planning all along to use a small 5000 BTU window AC, sized the inverter to drive it easily, and laid out the headboard to accommodate it.  But I was struggling with mounting the thing in the tongue box, whether I should get a commercial one and surgically alter it, or build one.  At the same time, I kept seeing ads and videos about Zero Breeze.  So I started researching it, and liked what I read.  And it runs on 24 volts, so that really means the insta-pot is the only major use for the inverter!  NOW I have to string new wire from back to front.  I'm glad I buried a pull string in the wire-way.  I'll pull a new one along with the 10Gauge wire just in case there's something else that needs to go in.  


Sunday, May 15, 2022

Roof, roof! (and other bits of progress)

 OK, it _still_ a really bad dad joke, but that's where we are. The roof is more or less installed.  There are
some spots that I need to go back and countersink screws - edge grain of plywood has slightly better zero holding power, especially for staples.  And there were a couple of interesting 'learnings' - like the fact that the point at which a 5 foot sheet lands on the inside of a frame is very different from where it lands on the outside - didn't take that into account...

The last was fairly easy to address - the end of the panel was in a relatively flat spot and right in the middle between frames, so I added a 1/2 inch doubler and screwed both sheets into that - worked just fine.  I also used Weldwood III instead of my normal II in order to gain a little more work time - we've gone from too cold to nearly too warm in the matter of a week.  


The other project of the week has been the hatch.  I'm still not convinced it's right, but I'm going to run with it for the moment.  There are a few 'fit and finish items that I think might be improved upon.  BTW, you can see the green 'lunch counter' through the hatch.

The hatch is seven 3/4'' ACX ply ribs with basswood stringers, a 4¨ oak top plate, and a 3/4¨ oak sill plate. The former will provide strength for the hinge, and the sill plate should be strong enough to latch through.  

The sides will go on this week, weather permitting.  My plan is to position the side, add a few screws for a 'ledge, and then roll on a good coat of contact cement - press it on and pressure roll it into place.  


Hindsight is [almost] always 20/20...

 As I've said before, this trailer has been a very agile project.  There have been more than a few compromises, changes, and adjustments...