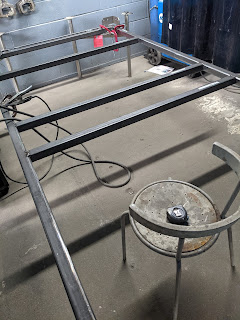
Monday, November 29, 2021

More metalwork

 With a bit of sunshine still sneaking in the shop windows, I got a better look at the welds this afternoon.  Mostly, they looked OK.  There were a few that needed a bit of touching up, and a couple of fat blobs that really needed to be filed down.  Considering that this is the first 'real' project I've welded, I'm pretty happy about that.  
I spent a fair amount of time addressing the things I found, and then it was time to install the tongue.  As I think I mentioned, my only real screwup (so far) was to order all my steel cut at 10' 1".  This worked just fine, except for the length that I was planning to get 3 8' sections for the tongue triangle...  Oh well. Not the end of the world, and I've another project that will suck up the excess.  

So off to Metals Supermarket for a length of tube.  They'll cut to length, and were more convenient than the other guys this time.  

Next, it was time for measuring, nudging, measuring and well, measuring.  The numbers from tip to corners were within 1/16 of an inch for both front and back.  I grabbed one of the other guys in the shop and had him measure while I held the tape.  Same result.  I don't think I could possibly adjust and get that any closer!

So back into my welding gear and get 'stacks of dimes' down on the 4 seams.  OK, some nickels, dimes and pennies mixed together, but they looked pretty decent.  I'll reinspect tomorrow.

On a slightly down note, I think my ability to move the frame by myself is coming to a screeching halt.  I have been standing it up and slipping the dollies under the frame, then rolling it to/from it's storage spot, and then unloading.  I noticed tonight that the darn thing is getting heavier than I want to lift solo, and there are still a few tubes to add to the nose!  

Next steps - add wings to the tongue, do a bunch more weld and flap wheel work, temporarily position the Timbren suspension, and drill a bunch of holes.  

Saturday, November 27, 2021

Welding day

Thanksgiving weekend seemed like a good time to do the frame.  Lots of available hours, and little competition for the shop space.  

I should have set up a cool stop motion video of the frame build today, but our lighting is 'not good', which is code for pretty bad.  To make it more difficult, grey metal against a concrete floor and grey walls - definitely not interesting. 

I did take a couple of pictures along the way, but nothing that rises to the level of 'wow'.  It's kind of hard to hold your phone in one hand while holding a MIG torch in the other, and have anything come out.  I definitely did not want to be one of those "Instagramdiots¨ that sacrifices safety just to get the perfect shot.

I spent an extended spell on Friday with the grinder, chamfering tube ends, removing mill scale, and cleaning up rough spots.  Also drilling holes for clearance and tail lights, realizing that my backup lights won't fit where I wanted to place them, and figuring out how to handle the wire routing for the aforementioned lights.  

I decided that the bumper would be slightly wider than the width of the trailer - like half an inch.  I wanted to make sure that if I ever clipped something backing up, that the bumper would be most likely to make 'first contact'.  


Bright and early Saturday morning, I started setting up for actual welding.  I had to chase around a bit to find stands that matched.  The table leg set was a perfect match for the aluminum squares I found under another table.  I started out with the outer tubes, using the construction jigs to square everything up and clamp it down, and then diagonal measuring it to make sure it was exactly square.  I started out tacking the opposite corners on top, and then circling back to tack the inside lower corner.  Once all corners were tacked, I started back running full welds across the tops, and then repeating on the verticals.  I didn't try to do the outside welds today.  I'll tackle those in the next round.  

Once the outer was all done, I added the cross-bars at 48, 60 and 96 inches.  The 60 inch bar corresponds with the front of the Timbren axle, and will help absorb any torquing from it.  

Once the bars were in, I added the trailer mounting tabs, and then ground the welds flush using a flap wheel.  There were a few spots that needed attention, so I added a bead to those spots and ground them smooth as well.  

And at that point, I called it a day.  Six hours bent over the frame with a torch or grinder was more physical work than I'd normally do in a week!  Very happy with where it is at this point.  

And in case you are wondering about the open tubes, I'll plug those with 3D printed caps after it's all done.  Until then, I have access to pull with thru the frame rails instead of hanging it underneath.  

So far, alignment looks good.  In spite of best efforts, there are a few little deviations from perfect, but the frame is square to within 1/16¨ of an inch on the diagonal, and level within about the same.  I doubt any of this will matter within the grand scheme of things.


Another installment in a day or so.  Next up, weld and grind the bottom, add the front triangle, measure and drill the suspension, and then pack the frame off to be powder coated.  And yes - that's a little more expensive, but I think having a bombproof finish will be worthwhile.  


Saturday, November 13, 2021

Steel is real

Old blade on top!

It's officially begun...  The Timbren suspension is in, and I ordered steel this week.  Metals Supermarket delivered it to the shop on Thursday afternoon, and I got it all racked & stacked.  This morning started out with a *very* dull bandsaw blade, and a quick trip to the store for a new one.  

With that done, it was time to cut some steel.  I decided to make the whole thing from 2x2" 1/8"wall tubing.  Several reasons for this, not the least of which is that Timbren recommends 1/8 wall or thicker at the mount.  There are games that could be played here, but i'll pass and do it right.  

I ran out of time to do the drawbar triangle, so I'll take that on tomorrow.  Next up is getting the tubing all cleaned up to weld, the ends all deburred.  And then semi-endless fitting to ensure that everything is within about .0625, measure, mark and drill holes for wiring to run through the frame.  Final placement of the cross members is a few days out pending a decision on axle placement.  

Anyway, here's a little steel.


Monday, November 1, 2021

The build has officially begun.  This week, I ordered 2000lb HD axle-less suspension from Timbren.  It's probably overkill, but I wanted to ensure I have ground clearance so that going over water gaps and minor stuff isn't dragging bottom going into BLM sites.  And my next tow vehicle will probably have a bit more ground clearance.
Once everything is in town, I'll order steel and start cutting/drilling all the holes necessary to install lights, the axles, receiver, fender braces and so on.  


Hindsight is [almost] always 20/20...

 As I've said before, this trailer has been a very agile project.  There have been more than a few compromises, changes, and adjustments...