Sunday, February 27, 2022

Walls 'done'!


 Well, ok.  Not 'done-done', but nearly done.  The final coat of epoxy is hardening on the bottom right now, and I'm taking the afternoon mostly off to go ride my bike.  

Things I learned from these - 

Baltic birch soaks up Titebond 3 (varnish too!) like a sponge.  It takes a lot more glue than I expected, so I'm glad I bought a gallon!

When planning to cut the top layer rabbet using the core layer as a guide, make sure the core rabbet is deep enough for your router bit stack height (I had to grind off most of the screw holding the bearing in place to get it to fit.)

The use of some staples is almost unavoidable.

Don't forget to plan and clean a pocket for your door side switches, and the cable next to them.  (I did on the first wall - will go in from the back, mill out a path, and then cover it.  Oops - lotta extra work!


Friday, February 25, 2022

One can never have too many clamps!

The first task tonight was to machine 3/4 inch foam to match 3/4 inch plywood!  (hint: it's not really 3/4 inch foam or plywood!)

Pink 3/4 inch foam is actually about 1/16 inch thicker than the plywood.  Too much to force fit.  Instead, I used the spoil board facing program for our CNC to remove an even 1/16 (.065¨) from a panel of foam insulation.  15 minutes well spent!


Glue.  Lots of glue - the panels for the interior of one side took over a quart!  I had a glue spreading partner tonight, and we were able to knock it out pretty quickly - but that's a lot of glue to spread with a 10 minute pot life!


And finally, there's no substitute for lots of clamps.  Except maybe buckets of water to weight down the panels!

Unlike the outer panels that have tons of narrow crown staples, the interior is mostly relying on glue.  There are a few well placed pin nails, but I'm hoping that the bond will suffice for most of this job.

Wednesday, February 23, 2022

Roll & Tip

 There is something very Zen about roll and tip.  The effort expended to get a smooth, consistent finish, to exactly duplicate the brush stroke with the same pressure, same angle, same direction across the width and length of a panel is more art than science.  And at the end of the day, maybe it doesn't actually matter - but it feels right.  


Monday, February 21, 2022

Varnish - step one

 Step one is really sand the heck out of everything, but we'll pretend that's step 0.8 and 0.9...
A bit of a hairy dog story, but Friday, on what was a brutally cold and windy day, I made my last big 'wood run'.  Not having a pickup or van, I hooked up the trusty utility trailer to the Volvo, and headed off to Forest Products for a stack of plywood.  Several dollars later, and I was on my way to the shop to rack and stack everything, and make a couple of re-cuts that were necessary due to my screwups in properly placing panels on the CNC - (which really stands for 'create new compostables'...)


On my way home, the trailer got hit by someone trying to drop in right behind me on the cloverleaf!  The trailer lost a clearance light, their car didn't fare so well.   They were nice about it, the young guy in the Smokey Bear was nice about it, so I just headed home.  I can replace a clearance light.


When I got back home, I had a great UPS 'present' waiting for me.  As I'd mentioned in the last post, I have become increasingly nervous about delivery times on components. So as I have finalized my choices, I'm ordering 'stuff'.  The ICECo VL45 cooler seems like a solid choice.  I knew I wanted a plug-in cooler, and after a fair amount of research, I decided on the VL45.  It'll be plenty big for a weekend's beverages and a steak or two :)


Tonight was spent laying down the first coat of varnish on the interior walls.  Mostly because of past experience with the vendor, I chose to go with TotalBoat light amber gloss varnish for the interior.  It's a couple of bucks more than some of the other products, but the quality is excellent, plus Jamestown and Totalboat stand behind their product.  

I chose to roll on the base coat with a 1/4¨ nap 6" roller, and then tip it with a 3¨ polyester/nylon brush.  I can still feel a little roughness in the surface, which will get knocked down by the next sanding pass (320/400) and we'll see whether it needs 3 or 4 coats!

Panels drying in the finish room


Thursday, February 17, 2022

Supply chain

 Anyone who has tried to buy or order almost anything this winter has run into delivery issues, or seriously jacked up prices.  There are still some really quality sources and parts out there, but not many 'deals'.  I made a couple of foundational commitments - I wanted big doors - big enough to disappear a bike into the trailer if needed, so I put my order in to Challenger back in early December.   They came in on Tuesday, actually right on the ¨8¨ of ¨8 to 10¨ weeks.  And even though the packaging was a little sketchy, they came in undamaged and with all parts attached.  I will pull them out when it's warmer and brighter to take a picture of them.  

The other area that I did spend a lot of time overthinking was the electrical. I wanted to make sure I had the parts, and since supply chain shortages haven't really improved, I started ordering the 'big stuff' early.    I have to sit down and draw a schematic (or really - modify someone else's), but I did start ordering components.  And - the things I wanted were actually in stock!  It probably helps that I'm doing 24v instead of 12v.  Most quality 12v stuff is either backordered, or the prices are, ahem, proud...

I will be attaching ~200 watts of flexible panel to the trailer, and will add electrical connections for an additional 200W external/portable to point more directly at the sun.  Batteries are in - 100AH/24v, a 2500
watt pure sine converter, and the solar charge controller.  Yet to acquire - the distribution components, and a shore power charger.

I'll do a whole article on electrical systems, but the reason for 24v is pretty straightforward - wiring.  4ga
wire is a pain to route, a pain to crimp, and a pain to buy.  6ga isn't that much better, but everything is less money, and much easier to route, and a 24-12v converter is inexpensive to power the 12v loads (lighting, device charging, MaxxFan, etc.


The other component I was especially nervous about getting in house before I started nailing up the walls was the heater.  I can go back and add most things,

but I did NOT want to be in the position of trying to shoehorn a heater in thru a hatch in the back of the galley.  So when I started looking for Propex heaters and found that they are on very short supply at most suppliers, I jumped on the chance to get a 2211 from a marine chandler in Seattle.  Now I can mount the heater while I'm assembling the internal bulkheads, poke most of the holes in the right places, put in appropriate insulation/heat isolation for the exhaust.  

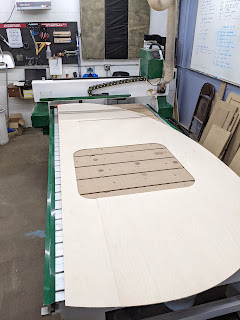
I'm still working on the walls, and will have a post later this weekend with progress there.  Hopefully fully assembled wall panels will be ready to bring home to finish and install at the end of the weekend.


Sunday, February 13, 2022

Outer wall laminations

 The outer wall sections are now laminated to the core!  This was kind of a milestone for me - getting the core bonded, and the outers on - Now I can actually visualize the dimensions of the full trailer.  There were a few little gotchas - like the edge at the back of the main outside panel where I was obviously a 1/4"inch closer to y=0 than I thought, and cut the panel just a tad short.  No big deal, but I will need to fill that void where the two outer panels should join up  

I used Titebond III to give myself a bit more work time.  And I learned it takes 16 oz to cover the entire side.  I happened to be in Rockler the other day, and they had this cool 5¨ glue roller that just seemed too good to pass up.  A touch spendy, but boy howdy, it's a lot better than trying to use a 3¨ roller!  The first panel I did I tried making a zigzag pattern with the glue and rolling it out.  Too much work.  Pour on a good puddle and use the roller to spread it out.  Much easier, faster and complete.  Then used a crown stapler to really secure the panels.


I splined the core panels together - 1/4¨ Freud slot cutter on a Bosch 12 Amp router made fast work of it, and a large pile of sawdust to boot.  
I used the ´caul & clamp´ method to pull the panels together, supplemented by bars across the back to keep the panel straight.  And the whole thing was clamped to the bench - again to keep it straight. 

Thankfully the shop has plenty of clamps - long clamps, pipe clamps, pretty much everything but speed clamps.  In a number of spots, I used a clamp across the piece to serve as a holding spot for a longitudinal clamp.  

The next couple of days will be mostly spent doing piddly stuff - making sure my inside wall CNC code is spot on, doing a little finish sanding on the outside in prep for a coat of penetrating epoxy, cutting insulation to fit, and cutting the inside walls.  

Hopefully by next weekend I'm ready to laminate those!

Thursday, February 10, 2022

The Jigsaw puzzle - Part 2

 Tonight's puzzle was brought to you by the letters A, C and X, and the numbers 3 and 4...

I got on the CNC tonight to cut the sidewall cores.  I must be learning something along the way, I didn't make a total hash of it, which is good.  
I don't have a good picture of it, but the CNC manager built an experimental vacuum hold down out of a couple of sheets of 1.5¨ pink foam, hollowed, perforated and glued up.  That and a shop vac makes a perfectly adequate full table clamp. It made aligning the sheet a little tricky, and I did let it slip over a little bit on the last panel - it still worked, but it was a little tight to the edge.  Aside from that, it worked great.

The other little gotcha from this episode is that I learned that the version of FreeCAD I'm using has a bug in the pocket routine.  I was still able to cut the rabbets for shelving and dividers by using a profile command, setting the depth by hand, and making a couple of passes to clear the middle of the groove.  If I'd thought a little longer, I could have offset the cutter by a little more and it would've saved me the clearing pass.

At the end of the day, I wound up with two sidewall cores that will spline together, and they match up with the outer wall.  I left the rear section solid since I haven't finalized the galley build (and may not before I start using it.  As you can see from the rabbets, there is a headboard and two shelves in the cabin, and a 'dead space' that will be the heater on one side, and electrical bay on the other. 


Monday, February 7, 2022

CNC Art


 If you look really closely at the image to the right, you may be able to pick out a few features, or just wonder what in the heck...

This is a composite of the cut jobs for the side wall cores.  The walls are made up of three layers - 1/4" Baltic birch on the outside, 3/4" fir plywood in the middle, and 1/4" Baltic birch on the inside.  Baltic birch is great - better laminations, consistent veneers, no voids.  Fir plywood is, well, plywood.  But it's reasonably solid, straight and inexpensive.  Splurge on the show, cheap on the no-show.

The three cut jobs shown here represent about 10 hours of work on the computer, and will probably take 2 hours of setup/cutting/cleanup.  From some old school boat building I've done, it would probably have taken nearly 40 hours to loft this using an offset table and batten marking, plus another 5-10 hours to cut and then clean up the cuts.  

Now in truth, it's probably a wash to this point.  I've spent an inordinate amount of time learning CAD/CAM, and figuring out some of the 'opportunities for improvement' in FreeCAD.  But the payoff is that now that I *have* figured things out, things like ceiling blocking are a matter of taking a sketch, sectioning a piece of it, and cutting multiple pieces to match.  And since with my design, there's quite a bit of blocking to be done...  That in itself will be a big payoff!

Next up - more CNC fun.  I will try to set up a camera for the whole operation and condense.  Should be interesting.

Thursday, February 3, 2022

The jigsaw puzzle - part 1

 Pretty good day on the CNC table today.  I didn't break any tools, didn't add any strange lines to the panel or the spoil boards, and didn't run out of table!

I think it actually took longer to clean up than it did to set up and cut.   This was the second outer panel, and it fit nicely with the other parts.  This is the first time I've had all the panels laid out, and they align nicely.  It's taken a bunch of hours to get this set up, and a few little 'learning opportunities to get past, but the payoff when I put this sheet of plywood on the table, anchored it down, and cut it (the video is uncut), was very satisfying!


Hindsight is [almost] always 20/20...

 As I've said before, this trailer has been a very agile project.  There have been more than a few compromises, changes, and adjustments...