Thursday, March 24, 2022

Update - interior work

If there is one area that I badly underestimated, it's the amount of time that is required to finish the interior.  Varnishing 40 square feet of space is a lot.  Getting it smooth and doing 3 or 4 coats is a whole lot.  And then there's the time spent figuring out that you really didn't think you A/C initial plan through very well, and you will need to do something else.  

I'll do a separate post on the A/C system, but in the short - the return duct will be a 12¨ panel in the headboard, and the cold air will come out of a duct that runs up the middle of the front wall from the top of the headboard.  Not the first change order to hit this project, and I'm sure it won't be the last 

Reddit fans are fond of 'today I learned..." factoids.  Well today I learned that cabinet doors are typically 3/4¨ thick.  So in order to make my Euro hidden hinges work for the headboard, I have to pad the top 3" of the backside of the doors with an extra layer of plywood.  

I'm learning to be a master of multi-tasking.  I generally have 3-4 'tasks' in flight at any given time in the shop, and bounce between them - let the glue dry on 'a', sander is available so work on 'b', finish room is open, so prep 'c' and get it in the finish room, back to 'b' to glue it while 'c' dries.  Grab 30 minutes on CNC when that opens up.  That's pretty much every trip to the shop.  Oh, and the occasional side trip to Menards for brads or whatever.

One other lesson.  While Festool sandpaper is the absolute bomb, I've found that "Serious Grit'' (Amazon) wears almost as well, cuts almost as well, and costs about 50% what Festool paper does.  

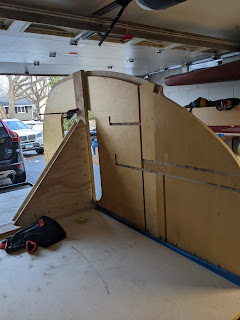
This coming weeekend will be devoted to varnish, and maybe, just maybe install all the cross-trailer panels and get the left side stood up!  (more likely early next week, given how much time it takes to varnish...)

One other side note - I *think* all the electrical is in - transfer switch, solar charging, battery system, fuse box, etc.  Now I need to think about lights and switch panels.  Dang this stuff sneaks up on you...


Wednesday, March 16, 2022

Milestone #4 - first wall up!

If I count completing the frame as #1, the floor as #2, and getting the walls assembled as #3, getting the first wall stood up is an easy #4.  This afternoon my neighbors came over and helped me stand up the first wall.  

Taping off the work area and buttering the seam with PL.  I used Loctite PL Premium.  I really don't enjoy working with PL - sort of like spreading peanut butter - a peanut butter that will rebound away from the surface if you spread it too thin or too fast.  But I have used it enough that I trust it, and *know* it will provide a good bond.


Stood up, clamped to the really big triangle, which is clamped to the trailer frame on the left, and the top of the door opening.  Plumb checked to make sure we're within about .1 degree of vertical.  
Pocket screws every six inches into the floor (great invention!) and screws on the outside every 4-6 inches to secure the outer walls.


From the outside.  and the fenders showed up while we were installing the wall!
From the front.  The big triangle is a 2x8x10' simply cut in half, and the triangles are one of the door cut-outs.  And then pocket screwed together.  I cut the 2x8 with the sliding miter saw at the shop, and then ran the 5' sections thru the planer just to flatten and smooth out a bit. 
It's heavy enough to stand on its own, but I clamped it to the trailer frame on the far side to keep it square.


Sunday, March 13, 2022

Weekend Update

 This was supposed to be a post about the first wall was standing and here's the video.  Didn't quite get there for a number of reasons, but I did:

  • Get the right side wall (left has been ready for a week) pocket drilled, grooves cleaned out, and a couple of little annoyances fixed.  Rounded corners cleaned up too!
  • Varnished back wall, ceiling panels
  • Accumulated a little more hardware in prep for final assembly. 

Fridge and stove shelves going together.  It took a little more time and a couple of false starts to get the clearance right so that things fit together properly.  

Hint: 40 thousandths seems about right.  Teeth are 1.98 and notches are 2.02 inches.  

Glued together with Titebond II.  They seem to be plenty strong.  

I got this task out of the way mostly on timing, and to ensure I could size the back partitions correctly. 


Roof spars bundled up to cut wireways.  Yes, I certainly could've done it on the table saw with a sled and a dado blade, but it would take me longer to set that up than it took to draw it in CAD and cut it with CNC.
These started out as an 11' plank of basswood that was pretty straight, dry and pretty good grain structure.  A few passes on the table saw and we have 1 1/4x 2¨ spars.  And I still have a nice bit of basswood in reserve (probably for the hatch!)


The sides came home.   You can see the cladding aluminum standing behind them waiting its turn.  The right side (shown here) will probably get bolted to the floor on Wednesday.


Last but not least, the trailer chassis finally got out of the garage, and the floor got checked for fit.  I always assumed it would fit properly - and it did.  

Sunday, March 6, 2022

Mistakes were made...


The nice thing about CNC is that you can pre-plan you dimensions, create 3D images of the various pieces, model them in place, and *know¨ that what you have drawn will most likely probably fit together flawlessly... 

Until you do something like change the model of cooler you have designed for, andddd... the cooler you bought is 2 inches taller than the one you drew the plan around, and... there was just enough clearance build in for the old one. So a quick trip thru the CNC to make a 3/4¨ slot template, a trip to Rockler for a top bearing 1/2¨ router pattern bit, a little dark stained cherry, and Bob's yer uncle.  One of my shop buddies is fond of saying '' no such thing as a mistake, just an opportunity for an accent feature''  So there's now an ¨accent strip¨ under the counter in back!


Thursday, March 3, 2022

Pocket screws

 Kregs pocket screw jigs are one of those next level tools.  I've done a couple of pocket screws the old way - angling a drill to try and get it to approximate a toe nail, having it split out the board, go in too deep, too shallow, too... whatever.  

But with a simple jig set, perfectly sized drill bit, and screws designed for the task - wow.  Just stupid simple.  And this is another task that could be done while the panel was sitting on a table - much easier than trying to do it 'in situ'.  


Hindsight is [almost] always 20/20...

 As I've said before, this trailer has been a very agile project.  There have been more than a few compromises, changes, and adjustments...