Sunday, July 31, 2022

Utility box version 2.0

 As mentioned in an earlier post, I had originally intended to use a small (5000 BTU) window AC to cool


the trailer.  This would have been fine - it would have been more than enough air to keep the trailer cool even in an Iowa cornfield, but it was a bit bulky and would have required more than a little creative ductwork.  And it would have necessitated what I came to realize was a truly ugly box.  As I was debating myself on the merits of this design, I came across another ad for the Zero Breeze Mk II, which was designed for cooling a camper, tent or similar.  It's small, very lightweight (about the size of an old canister vacuum, and best of all - it runs on 24vDC.  That in itself improves the working efficiency by 15-20% (no need to convert battery to AC).  Yep, ordered one and received it in about 10 days.  Perfect.


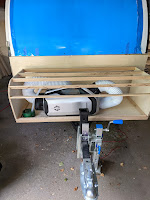
With that in mind, I took a fresh look at 'the box'.  I'd never liked the big black box, but it seemed a logical choice due to the space requirements.  I decided to design one that followed the lines of the trailer, and was a bit smaller.  After carefully measuring the Zero Breeze size, and made the box large enough to hold it and maybe a screen porch.  The new box size also means that I can drop the bike rack a few inches lower, which will improve driving - getting them down out more out of the air flow.  I was mostly able to use 'scrap' plywood panels to build it.  The floor is dominoed together from two pieces of 3/4 BB, and the sides are 1/2¨ BB with oak stringers.  I added blocking in the center and along the edges for a little extra surface area. 

Next trick was to skin the box and wrap it.  I first wrapped the top and front with 1/8th¨ BB, cutting strips around the knuckle rather than trying to bend the plywood in a radius it really wouldn't have been happy with.  I then 'doped' it with penetrating epoxy. For the next step, I started to bend the diamond plate just by leaning on it, which worked somewhat, but I was concerned about having it spring back and whacking me in the face.  I chose a more time honored technique - screwing it down to the top, adding holes every 4 inches along each stringer, and bending it around the curve as I went.   
I used some of my collection of canoe straps to pull it snug, and worked around the curve to get it to conform.   Many more Kregs screws to hold the top in place (because I had lots of those and not many stainless countersunk #8s.  I'll go back and replace the Kregs screws with the #8 stainless and stuff a little sealant into each hole as I install them.  

The end panels will be covered in the left over scraps from doing the sides, and the Seaflo hatches will get added as soon as the ends go on.  The seams will get wrapped with aluminum over sealant over tape later this week, and the whole thing sealed into the body with butyl, trim and mechanical fasteners.  


So now I have this great box and will wrap up the install this week.  And here's the humor for me - I had
really not contemplated how much sheer volume is consumed by 4" ductwork!  With three ducts emerging from the Zero Breeze, two into the cabin for cold air and return air, and an exhaust vent, they occupy a *lot* of real estate.  It's not glamorous, but they got handled and still left enough room for tools.  Also, the Zero Breeze has a set of slots on the bottom that conveniently fit a 1/4¨ carriage bolt, so that will get locked down too.   

Expect one more post on the AC and tongue box.  It's still a work in progress, but I am down to the last bits in prep for a 12 August shakedown run!


Monday, July 25, 2022

A bunch of little (and not so little) things

 It's been a couple of weeks since I did a 'real' update.  It's not that I haven't been working on the trailer, but rather because most of it hasn't been blog/photo worthy.  Except that I forget that some of the things are big milestone items.  Over the past 3 weeks, I've been struggling with 'the hatch'.  It has been bit my own nightmare in the making, so when I realized that the hatch I built just was not going to work, I have consigned it to fuel for the Solo stove and started over.  The new design is much more along the lines of the 'standard' with heavier multi-component side rails and lateral stringers.  I should have a post on it next week.  I'm also making headway on getting the battery pack assembled and wired, and on getting the shore power/transfer switch installed and wired.  

So to keep things moving and allow me time to think about hatch mechanics, I have now:

  • Installed the doors
    There are _tons_ of good videos on door installation.  I've gone thru a couple of rolls of butyl tape getting them in place.  Sticky stuff!  For reference, I went with the Challenger doors.  Less expensive, and OK for quality, but I don't have a good frame of comparison.  They were being purchased by Lippert at the time I ordered the doors, and delivery was 10 weeks.


  • Installed the MaxxFan
    I made a (correctable) mistake doing the final cut on the roof. Fortunately, it was cosmetic only and never to be seen by anyone.  For guidance, when cutting the top, it's adviseable to drill all 4 corners, and then draw lines between the holes - and maybe even paint tape to protect the paint from the saw.  It's easy to get an aluminm chip between the skin and the base of the saw.  Once you get the rough cut with a jigsaw, it's easy to make one final pass with the trim router and a flush cut bit to trim the hole back to the 14" frame dimensions.  Butyl tape to seal the fan into place and carefully tighten down the screws.

  • Installed the Propex heater (well physically anyway)
    This is an(other) install that has morphed a bit as physical reality met initial visualization!  I cannot overstate the complexity added by air ducts...  They do not simply mold into space- you have to account for bends, interference and inflexibility.  As you can see from the picture, I have an interference between the corner of the inverter and the hot air duct. That would last perhaps one trip before it rubs thru.  I'll print a cradle  for the duct that should protect it from abrasion.  I also raised, and offset the heater by an inch or two from the original mounting to give a little better bend radius for the ducts.  This isn't a big deal, and where the lines pass thru the floor will get centered/sealed as well.  
  • Designed/printed registers for the AC ducts
    This was a relatively simple task.  Visualizing designs in CAD has become a lot simpler for me, and it's cut trial and error down to a couple of iterations.  In this case, I initially tried to make the blades too fancy, which resulted in a less than stellar print.  Second  try I also angled the blades to give a little direction to the airflow.  It's a little time consuming, but with a decent printer, not too challenging.


  • Tossed out the plan to use a big ugly black metal box for the tongue box and gone with a svelte hand designed and cut one, mostly using scraps.  And it's looking good (so far)
    The profile of the box parallels the front of the trailer, and mimics the curve.  I'd convinced myself it would be too much work, but in hindsight - I'm an idiot:)  
    The hatches came in last night, and I'll cut the end caps to mount the hatches.  


  • One [more] thing I didn't account for very well - the ductwork takes up a *lot* of space!  It'll all work, but I think the kibble bag may wind up staying in the car!  The box is big enough to add a few tools, but the ductwork does limit some utility.  It looks a lot sharper than the big metal box!  

Thursday, July 21, 2022

Printed material

One of the most frustrating parts of a build are the little odds and ends that are required - adapters, plugs, grommets, vents, and other weird little widgets made of plastic and filling those 'specific purpose' needs.  The pursui t of which involves finding that none of the local suppliers have anything close, searching the net, finding something sort-of close, ordering it, waiting days for it to arrive, during which time your project is on hold, and then finally getting it and learning it... doesn't fit.  

I'm fortunate to have both the 3D printers, and some reasonable beginner CAD design skills to be able to visualize many of these, design a prototype, and then print it.  Sometimes it works, sometimes it takes a couple of attempts to get it right.  But with an hour of my time, and a couple of hours to print it, and I can quickly validate my assumptions, the part fit, tweak it a bit if needed, and it's ready to use.  


One example of this is the new ZeroBreeze Mk II air conditioner.  The Zero Breeze box contains the necessary ducts and fittings for the AC end, but nothing for the end of the duct.  Since my AC will be mounted in the tongue box, and piped back into the trailer body, I really didn't want the outlet to be a 4'' diameter piece of white plastic tube poking into the trailer!  It took me about 30 minutes to draw out in FreeCAD, 8 hours to print the prototype, 10 minutes to make changes to the louvers and outer chamfer, tweak the thickness, and then a second iteration to print (5 hours) a production quality version.  One feature of this version is that the louvers are angled 10 degrees to aim the air away from our heads while sleeping. 


There are a bunch of items that I've done the same for - from a pad for the bottle jack to fit over the 2¨frame tubes, to end caps for the rails, to collars for cable routing, and wire-way covers for burying wire in the walls.  I've included most of them in 3D prints for Teardrop build.  Feel free to copy, or if you see something you need, I will be happy to sell them as well.  I'm also available for design/prototype and custom print work.


I need to print two more - one for the return air, and a hot exhaust for the bottom of the box.  The one going out the bottom will have a little longer snout, and will have a 'lid' to clamp in a piece of screen to keep critters and insects out.


Hindsight is [almost] always 20/20...

 As I've said before, this trailer has been a very agile project.  There have been more than a few compromises, changes, and adjustments...