It's been a couple of weeks since I did a 'real' update. It's not that I haven't been working on the trailer, but rather because most of it hasn't been blog/photo worthy. Except that I forget that some of the things are big milestone items. Over the past 3 weeks, I've been struggling with 'the hatch'. It has been bit my own nightmare in the making, so when I realized that the hatch I built just was not going to work, I have consigned it to fuel for the Solo stove and started over. The new design is much more along the lines of the 'standard' with heavier multi-component side rails and lateral stringers. I should have a post on it next week. I'm also making headway on getting the battery pack assembled and wired, and on getting the shore power/transfer switch installed and wired.
So to keep things moving and allow me time to think about hatch mechanics, I have now:
- Installed the doorsThere are _tons_ of good videos on door installation. I've gone thru a couple of rolls of butyl tape getting them in place. Sticky stuff! For reference, I went with the Challenger doors. Less expensive, and OK for quality, but I don't have a good frame of comparison. They were being purchased by Lippert at the time I ordered the doors, and delivery was 10 weeks.
- Installed the MaxxFanI made a (correctable) mistake doing the final cut on the roof. Fortunately, it was cosmetic only and never to be seen by anyone. For guidance, when cutting the top, it's adviseable to drill all 4 corners, and then draw lines between the holes - and maybe even paint tape to protect the paint from the saw. It's easy to get an aluminm chip between the skin and the base of the saw. Once you get the rough cut with a jigsaw, it's easy to make one final pass with the trim router and a flush cut bit to trim the hole back to the 14" frame dimensions. Butyl tape to seal the fan into place and carefully tighten down the screws.
- Installed the Propex heater (well physically anyway)
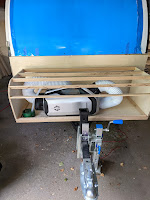
This is an(other) install that has morphed a bit as physical reality met initial visualization! I cannot overstate the complexity added by air ducts... They do not simply mold into space- you have to account for bends, interference and inflexibility. As you can see from the picture, I have an interference between the corner of the inverter and the hot air duct. That would last perhaps one trip before it rubs thru. I'll print a cradle for the duct that should protect it from abrasion. I also raised, and offset the heater by an inch or two from the original mounting to give a little better bend radius for the ducts. This isn't a big deal, and where the lines pass thru the floor will get centered/sealed as well.
- Designed/printed registers for the AC ducts
This was a relatively simple task. Visualizing designs in CAD has become a lot simpler for me, and it's cut trial and error down to a couple of iterations. In this case, I initially tried to make the blades too fancy, which resulted in a less than stellar print. Second try I also angled the blades to give a little direction to the airflow. It's a little time consuming, but with a decent printer, not too challenging.
 Tossed out the plan to use a big ugly black metal box for the tongue box and gone with a svelte hand designed and cut one, mostly using scraps. And it's looking good (so far)
The profile of the box parallels the front of the trailer, and mimics the curve. I'd convinced myself it would be too much work, but in hindsight - I'm an idiot:)
The hatches came in last night, and I'll cut the end caps to mount the hatches.- One [more] thing I didn't account for very well - the ductwork takes up a *lot* of space! It'll all work, but I think the kibble bag may wind up staying in the car! The box is big enough to add a few tools, but the ductwork does limit some utility. It looks a lot sharper than the big metal box!


No comments:
Post a Comment