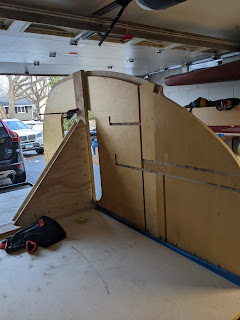
If I count completing the frame as #1, the floor as #2, and getting the walls assembled as #3, getting the first wall stood up is an easy #4. This afternoon my neighbors came over and helped me stand up the first wall.
Taping off the work area and buttering the seam with PL. I used Loctite PL Premium. I really don't enjoy working with PL - sort of like spreading peanut butter - a peanut butter that will rebound away from the surface if you spread it too thin or too fast. But I have used it enough that I trust it, and *know* it will provide a good bond.Stood up, clamped to the really big triangle, which is clamped to the trailer frame on the left, and the top of the door opening. Plumb checked to make sure we're within about .1 degree of vertical.
Pocket screws every six inches into the floor (great invention!) and screws on the outside every 4-6 inches to secure the outer walls.
From the outside. and the fenders showed up while we were installing the wall!
From the front. The big triangle is a 2x8x10' simply cut in half, and the triangles are one of the door cut-outs. And then pocket screwed together. I cut the 2x8 with the sliding miter saw at the shop, and then ran the 5' sections thru the planer just to flatten and smooth out a bit.
From the front. The big triangle is a 2x8x10' simply cut in half, and the triangles are one of the door cut-outs. And then pocket screwed together. I cut the 2x8 with the sliding miter saw at the shop, and then ran the 5' sections thru the planer just to flatten and smooth out a bit.
It's heavy enough to stand on its own, but I clamped it to the trailer frame on the far side to keep it square.


No comments:
Post a Comment