Thanksgiving weekend seemed like a good time to do the frame. Lots of available hours, and little competition for the shop space.
I should have set up a cool stop motion video of the frame build today, but our lighting is 'not good', which is code for pretty bad. To make it more difficult, grey metal against a concrete floor and grey walls - definitely not interesting.
I did take a couple of pictures along the way, but nothing that rises to the level of 'wow'. It's kind of hard to hold your phone in one hand while holding a MIG torch in the other, and have anything come out. I definitely did not want to be one of those "Instagramdiots¨ that sacrifices safety just to get the perfect shot.

 I spent an extended spell on Friday with the grinder, chamfering tube ends, removing mill scale, and cleaning up rough spots. Also drilling holes for clearance and tail lights, realizing that my backup lights won't fit where I wanted to place them, and figuring out how to handle the wire routing for the aforementioned lights.
 I decided that the bumper would be slightly wider than the width of the trailer - like half an inch. I wanted to make sure that if I ever clipped something backing up, that the bumper would be most likely to make 'first contact'.
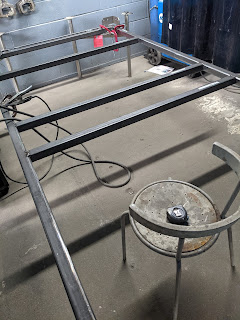
Bright and early Saturday morning, I started setting up for actual welding. I had to chase around a bit to find stands that matched. The table leg set was a perfect match for the aluminum squares I found under another table. I started out with the outer tubes, using the construction jigs to square everything up and clamp it down, and then diagonal measuring it to make sure it was exactly square. I started out tacking the opposite corners on top, and then circling back to tack the inside lower corner. Once all corners were tacked, I started back running full welds across the tops, and then repeating on the verticals. I didn't try to do the outside welds today. I'll tackle those in the next round.

Once the bars were in, I added the trailer mounting tabs, and then ground the welds flush using a flap wheel. There were a few spots that needed attention, so I added a bead to those spots and ground them smooth as well.
And at that point, I called it a day. Six hours bent over the frame with a torch or grinder was more physical work than I'd normally do in a week! Very happy with where it is at this point.
And in case you are wondering about the open tubes, I'll plug those with 3D printed caps after it's all done. Until then, I have access to pull with thru the frame rails instead of hanging it underneath.
So far, alignment looks good. In spite of best efforts, there are a few little deviations from perfect, but the frame is square to within 1/16¨ of an inch on the diagonal, and level within about the same. I doubt any of this will matter within the grand scheme of things.
Another installment in a day or so. Next up, weld and grind the bottom, add the front triangle, measure and drill the suspension, and then pack the frame off to be powder coated. And yes - that's a little more expensive, but I think having a bombproof finish will be worthwhile.


No comments:
Post a Comment