Tuesday, November 8, 2022

Hindsight is [almost] always 20/20...

 As I've said before, this trailer has been a very agile project.  There have been more than a few compromises, changes, and adjustments on the fly, and hey - in my defense, I've never done this before, and some of the 'rules of thumb' are an opportunity to insert your thumb between the board and the hammer!

In this case, I'd designed the trailer frame with a standard hitch receiver mounted on the tongue.  If I'd thought about this just a little more carefully, I _might_ have calculated the weight of the rack, and the bikes and factored that extra 125lb into the calculation for axle placement - and moved the darn thing a few inches forward.  As it was, my tongue weight was closer to 230lb with the trailer loaded, so 300 would be very much too much.

But that's all water under the bridge.  Fast forward 10 months to now, and I realized that in order to bring bikes they'd either have to go on the roof of the car, or on the back of the trailer.  I opted for the latter.  Having acquired fairly decent CAD skills, I sat down and whipped out a very elegant folded piece of 1/4" steel, and sent that off to Send-Cut-Send.  Nope, the drawing was not something they could work with, and from the sketch, the price would easily buy enough steel to rebuild the whole darn frame...


So back to the drawing board.  I started looking at hitch bits on the internet, and realized that all I really needed was a simple plate that could be replicated 3 times, and a steel tube for the receiver.  Twenty five minutes later, I sent the new drawing off to Send-Cut-Send and received a quote that was *much* more reasonable (and in line with my target.  

A week later, I received my 3 plates in a plain brown wrapper - FedEx guy commented that he didn't think the dog could carry it (she loves to handle the 'last mile' for FedEx), and he was correct.  A quick trip to CoreMark for a 36" chunk of 'receiver tube (2.5" sq tube, .25 wall), and I was on my way to the shop for the evening.  A little filing to open up the hole in the plate, a fair bit of time with the flap wheel to clean everything, and then a quick trip to the MIG welder, and I was on my way.  The welds look horrid if I judge them fairly, but there's more than enough to keep the plates from ever breaking loose - and all three plates would have to break loose before the tube could move. A little cleanup with the flap wheel, a good wash down with acetone, and a couple of coats of primer and it's ready to finish coat.
A signature of mine is that any major project I do contains one red component.  I started this years ago building bike wheels, with one red spoke nipple, and even before that on sailboat repairs, using red nail polish to cover a screw head (usually in a bilge).
In this case, I went slightly overboard...
It's bolted to the frame with 4 grade 8 bolts, across both the rear and next cross tubes, and it's definitely solid. I need to re-check the tongue weight, but I think it took about 50lb off the tongue.  It does make the trailer a little more 'lively' to pull - it was so dead solid, but still less so than many boats I've pulled over the years on factory trailers.  
It'll probably be spring before I have a picture of everything - the trailer is in the garage, most likely for the winter, but I promise I'll post more pics to "Life in the Swamp" next spring, and any additional construction details here as they get done this winter.  Yes, there are still at least 10 projects to be finished on the build before it hits my definition of 'done'.


Tuesday, November 1, 2022

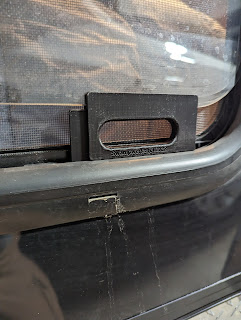
The Window Wedgie Widget

 A couple of weeks ago, we were camping our way across the West on our first long trip - the two of us


and our two fur kids in the teardrop for two weeks from Minneapolis to Oakland and back.  And on the second night out in Veedauwoo Wyoming, it was downright chilly!  To keep from totally steaming up the trailer, a little ventilation is essential (and my safety vent isn't enough).  So I latched the window open and dealt with an icy breeze blowing in on my delicate backside.  I did figure out that you could sort of 'jam' the window partway open, but still...

So sitting at my computer a few days back, I thought about those nights and decided there was a better way - enter the Window Wedgie Widget (or SW-W3 for short).  And pretty soon every problem starts to look like a nail if you have a 3D printer.  So I whipped out a few prototypes that evolved into this - the Window Wedgie Widget.  The left hand picture is deployed in the 1.5" position.  Flip it vertical and it gives you 3.5" of gap.  It's made of plastic, fits snugly in the track, and stows - well wherever you want to stow it!

This works great.  I did a solo weekend trip to Arkansas, left this in every night, and had zero condensation - and no frozen backside (ok, it wasn't really that cold - the heater only kicked on once the whole trip).  


If you are interested, please drop me a note and I'll be happy to send you one or a pair of your very own.  I am selling these locally and on ebay at $9.99 for one, and $15.99 for a pair (plus shipping). Right now, I'm only making in Henry Ford's favorite color - black - but colors are a possibility too.

I'm also making a variety of other widgets to fix common problems - spacers, hole covers, anti-rattle shims, tube ends and so forth.  If you need anything like this, please drop me a note.  If I don't already have something, chances are we can figure something out!

Thursday, September 15, 2022

Electrical system

 Several people have reached out about the electrical system, what I have for batteries, etc.  I am by no
means an expert here - I have enough knowledge to be somewhere in that spectrum between slightly dangerous and mildly competent, but that's about it.  I did a lot of research, looked at a ton of youtube videos (thanks Will Prowse! ), plus numerous others on what they did with *their* trailer or van.  I also had the advantage of having purchased a number of 50A cells for a boat project that I didn't move forward, so I had my batteries already.  I will add the major electrics to my source list later, but here's a brief writeup on the electrical.

The core system is 24v, with a 12v converter to power lights, fans, and other things that only use 12v.  The major power draws (inverter, air conditioner, fridge) all run on 24v, so no power loss is required to step the voltage up/down or invert.  The 2500W inverter is, at the end of the day, grossly oversized as it was initially sized to power a room air conditioner.  Powering an instapot or other appliance is overkill, and I may still replace that with a smaller unit.  

Anything that looks like a loose cable just hasn't been secured yet.  I'm still working on getting shore power installed and the transfer switch wired in.  I came up short on working space for it, and made a 'strategic decision to relocate it - so that bit of wire still needs to be run!  And then everything separated and tidied up.  
The battery cells are in a fitted wooden box that is secured to the bulkhead, and protected with a shelf over the top of the cells.  It is still _possible_ for debris to reach the cells, but pretty unlikely anything metallic/conductive can get in.  

The specs:

  • 24vDC 100AH LiFePo4 battery pack - Grade 1 Chinese cells, 3.2v 50A arranged 8S 2P.
  • 200W flexible solar cells (2x100W serial connected)
  • 20A 24vDC MPPT solar controller
  • 5A 24vDC out charger (120VAC in)
  • 2500W pure Sine Inverter
  • 30A transfer switch for shore power, with 15A breaker on galley outlet and 10A up front. (which will likely never be used).

Most of the wiring is 8ga, with 4ga to the Inverter.  Device wiring 10-14ga depending on anticipated load, and yes - mostly oversized, marine grade copper.  I *did not* want to worry about fishing a broken wire out of the ceiling runs.  There are fuses/breakers at multiple points in the system, hopefully protecting each individual component as well as the system overall.  


 From left to right: 
DC breaker to disconnect Solar panels  
MPPT control/display
Battery disconnect switch
24v distribution/fuse panel 
12v distriution/fuse panel


In hindsight, and if I didn't already have the batteries, I'd probably get a pair of 12v 200AH batteries and an integrated controller.  But it would've been a bit more money, and I would not have had the fun? of doing it myself.

Thursday, September 1, 2022

First road trip


 After the past few weeks of jamming on details (and a few not so small items), it was time to go camping. So we loaded up the fur kids and headed 'up nord' as a good Minnesotan might say.  We did almost 1000 miles over 4 days, stayed mostly in state park campgrounds, tested out a few systems, and mostly took it easy.  

Boy was I glad I spent the time to seal all the seams.  That came out 'ok' from a look standpoint, and I'll go back over them again soon just to make sure I don't have any gaps.  The very first night out, there was a significant thunderstorm that dropped a half inch or more of rain on us.  No problems at all.

The trailer tows like a dream. Tracks true, soaks up any bumps.  I never really noticed it back there.  Except on the gas guage - it pulls mileage down about 5mpg.


Things that worked: 

The electrical system.  It charged just fine with solar, ran the fridge the whole trip, lights and MaxxFan as
needed.  We didn't need heat or air conditioning, which is good - because neither was hooked up!


The mattress was surprisingly comfy.  Six inches of foam beats a thermarest all to pieces!

Venting seemed about right.  With both door windows open, and the fan on low, there was enough air flow to keep things pleasant.  Had it been really hot or sticky, we could've run the AC by extension cord.  

The stove.  Camp Chef Everest 2X.  This was a treat.  It just worked, the temp was very controllable, and cooking on it was easy.  The slide-out shelf was positioned pretty well.  And it's really nice to turn the stove on in the morning and have it heat water for coffee as fast as the one at home does.

Next up for the galley will be a set of drawers that fit between the fridge/electrical bay and the stove bay.  Having a storage spot for kitchen stuff is a must.  We'll also plan what goes above the stove - that wall is a blank slate at the moment.  Winter project!


And there are still a bunch of projects to finish up:


  • Bike rack
  • Shore power
  • Permanent propane hookup
  • Heater
  • AC wiring (part of shore power)
  • Rear light bar
  • Decide what to do on the hatch (winter)

The nice thing is that none of these are show stoppers, and we can camp for at least the next few weeks without any of them happening, although winter is coming, and heat will soon become an issue so I'd better get that squared away!


Sunday, August 21, 2022

Galley - a work in progress

 The galley end of the trailer is very definitely still a work in progress.  There are a number of tasks still to be completed before it's really functional, but you can get an idea of the basic shape.

The 45 liter Iceco was a great addition.  One of the keys for me is that it runs on 24 volts, which means it doesn't need the voltage stepped down (or worse- run thru the inverter).   You can also see the Propex heater installed on the lower left wall.  Like the stove above it, it's awaiting hookup - I need the bottle mount to arrive so I can mount it and the regulator outside, and then will plumb it to the two units.  Eventually, there will be a water jug in the propane bay, and some drawers in the leftover space between the two sides.


Both the fridge and Camp Chef stove sit in finger-jointed box frames made from 1/2¨ Baltic birch, and cut on the CNC.  I learned making the first one (which fit the Iceco too tightly) that when CNC'ing interlocking fingers, you do need to leave a little clearance between them.  So making the pins .98¨ and the gaps 1.02¨ worked out just right.  They're glued up with Titebond II, and finished with a few coats of Total Boat water based varnish.  I cannot say enough good things about Total Boat products.  They are not cheap, but you definitely get your money's worth.  Easy to work with, dries quick, and great support.  I've finished a boat, and this camper with their product, and I absolutely love it.  And no, they don't comp me.

The back wall is still a work 'in study'.  I decided that the right half would be used for electricity related 'stuff', like switches, fuses, meters, etc, and the left side will eventually turn into storage for kitchen gear.  I'll put some sort of doors over the electrical bay so that it doesn't spoil the view.

An earlier shot of the right hand bay.  I'll pull the fridge and get a 'final' shot, but at the moment - here it is.  
Widget ID starting from the top right -
Epever 20A MPPT charger.  I tried to balance cost/performance.  This can handle the current 200 watts of solar, plus another set if I were to choose to add them later.  
Victron IP67 5A charger - will be connected to the shore power side of the transfer switch.
Fuses and wiring
12v buck supply - to step down 24v to 12vdc for lights,  the heater, fan, etc.  40A should power everything with more than a little room to spare.
Here's the Propex all vented in, and the 2500W inverter.  I got the inverter when I was planning around a 5000BTU room air conditioner, and needed AC power.  Now that I have an AC unit that will run on 24vdc, this is gross overkill, and I'll probably sell it and replace with something about half the size.  The biggest thing I anticipate needing AC for is a small Instapot.  It draws more power than the fridge does when in idle state.  

What isn't shown here is the battery pack - 16 50Ah LiFePo4 cells wired series parallel to provide 24 volts 100Ah of usable power.  I'll add that to the walkaround.

 That about wraps up the galley at the moment.  As you can see in a couple of pics, this is a work in progress.  I still don't know what all the nooks and crannies will be used for, but we'll figure it out as we go.  

Monday, August 15, 2022

Soft launch!!!


It's done - or at least somewhat usable...  It's been almost exactly one year since my wife and I first talked about the idea of a teardrop (since the motorhome was a non-starter).  I spent a month or so researching, watching youtube videos of manufactured trailers, people's video blogs, youtube channels, personal blogs, and Tony's book, ¨Building a Teardrop Trailer¨.  And by October, I'd decided that I could build what I wanted, instead of buying it.  There are a lot of cool trailers out there on the market, and I didn't build because they weren't available, but rather because they didn't tick all the boxes - or mostly, ticked too many!
When it was all said and done, I wanted:
  • A queen sized bed
  • Simple storage
  • Heat
  • AC
  • Fan
  • Stove
  • Fridge
  • No plumbing

What you see here is the 'soft launch' - mostly done, but still a lot of cosmetic touches to finish up, a lot of seam sealing, and a few things left like hooking up the AC, hooking up the propane system for heat and stove, and some more cosmetic touches.  

The really important stuff - it tows well, the mattress is comfortable, it breathes, and I think it shined up pretty well.  I have to admit I took a step back when I pulled off all the blue and really got to look at it.  
I'll do a couple of additional posts over the next few weeks, including the always questionable 'cost sheet'. 

Sunday, July 31, 2022

Utility box version 2.0

 As mentioned in an earlier post, I had originally intended to use a small (5000 BTU) window AC to cool


the trailer.  This would have been fine - it would have been more than enough air to keep the trailer cool even in an Iowa cornfield, but it was a bit bulky and would have required more than a little creative ductwork.  And it would have necessitated what I came to realize was a truly ugly box.  As I was debating myself on the merits of this design, I came across another ad for the Zero Breeze Mk II, which was designed for cooling a camper, tent or similar.  It's small, very lightweight (about the size of an old canister vacuum, and best of all - it runs on 24vDC.  That in itself improves the working efficiency by 15-20% (no need to convert battery to AC).  Yep, ordered one and received it in about 10 days.  Perfect.


With that in mind, I took a fresh look at 'the box'.  I'd never liked the big black box, but it seemed a logical choice due to the space requirements.  I decided to design one that followed the lines of the trailer, and was a bit smaller.  After carefully measuring the Zero Breeze size, and made the box large enough to hold it and maybe a screen porch.  The new box size also means that I can drop the bike rack a few inches lower, which will improve driving - getting them down out more out of the air flow.  I was mostly able to use 'scrap' plywood panels to build it.  The floor is dominoed together from two pieces of 3/4 BB, and the sides are 1/2¨ BB with oak stringers.  I added blocking in the center and along the edges for a little extra surface area. 

Next trick was to skin the box and wrap it.  I first wrapped the top and front with 1/8th¨ BB, cutting strips around the knuckle rather than trying to bend the plywood in a radius it really wouldn't have been happy with.  I then 'doped' it with penetrating epoxy. For the next step, I started to bend the diamond plate just by leaning on it, which worked somewhat, but I was concerned about having it spring back and whacking me in the face.  I chose a more time honored technique - screwing it down to the top, adding holes every 4 inches along each stringer, and bending it around the curve as I went.   
I used some of my collection of canoe straps to pull it snug, and worked around the curve to get it to conform.   Many more Kregs screws to hold the top in place (because I had lots of those and not many stainless countersunk #8s.  I'll go back and replace the Kregs screws with the #8 stainless and stuff a little sealant into each hole as I install them.  

The end panels will be covered in the left over scraps from doing the sides, and the Seaflo hatches will get added as soon as the ends go on.  The seams will get wrapped with aluminum over sealant over tape later this week, and the whole thing sealed into the body with butyl, trim and mechanical fasteners.  


So now I have this great box and will wrap up the install this week.  And here's the humor for me - I had
really not contemplated how much sheer volume is consumed by 4" ductwork!  With three ducts emerging from the Zero Breeze, two into the cabin for cold air and return air, and an exhaust vent, they occupy a *lot* of real estate.  It's not glamorous, but they got handled and still left enough room for tools.  Also, the Zero Breeze has a set of slots on the bottom that conveniently fit a 1/4¨ carriage bolt, so that will get locked down too.   

Expect one more post on the AC and tongue box.  It's still a work in progress, but I am down to the last bits in prep for a 12 August shakedown run!


Hindsight is [almost] always 20/20...

 As I've said before, this trailer has been a very agile project.  There have been more than a few compromises, changes, and adjustments...